Session 8 - Multiplex Classifiers#
Goal: Learn how to combine individual classifiers into a single, multiplex classifier. Also, learn how to interpret and work with the output of that multiplex classifier.
YouTube video walkthrough: Session 8
1. Combining Classifiers#
If you did not complete the 3 classifiers in the last session, download the project “Proj1 - Session 8” and open it. This has a version of the classifiers we will need moving forward.
We can view the cell classifiers we have created by going to
Classify > Object classification > Load object classifier.Click on CD4_CD8 and hit Apply classifier
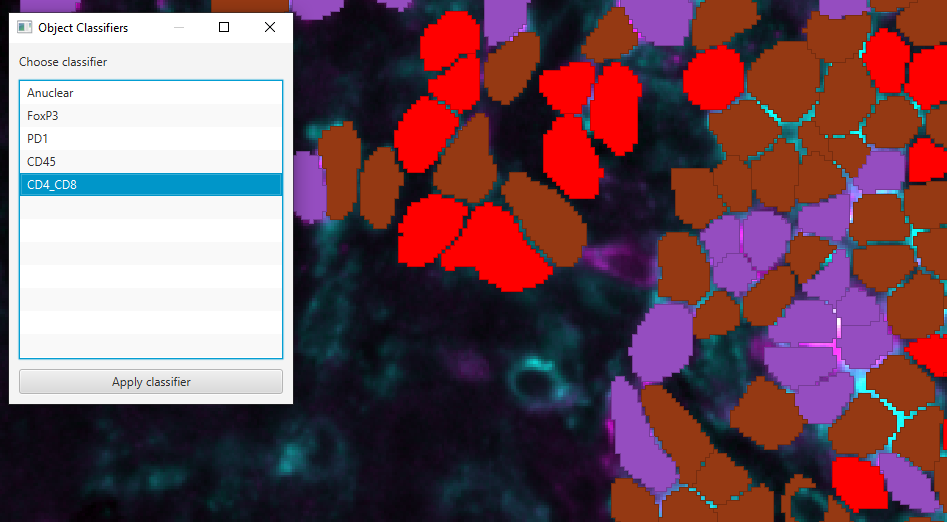 (Your colors may be different)
After, if you apply a different one, you lose the CD4 CD8 results.
To combine the classifiers to get all results simultaneously:
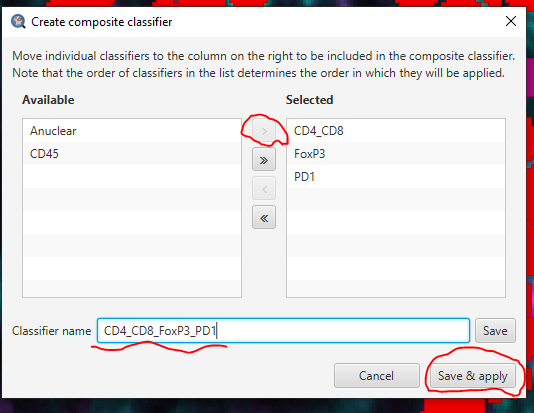
Classify > Object classification > Create composite classifierSelect the CD4_CD8 and click > to move it to the Selected list
Repeat for FoxP3 and PD1.
The order that you add the classifiers will determine the final order of how the cells are named. For example “CD4: FoxP3: PD1” vs “FoxP3: PD1: CD4”. It will NOT affect the actual cell counts.
Give the new, combined classifier an informative name and click Save & apply
2. Composite classifier results#
Click on the Region* annotation and look at the Annotations tab bottom window
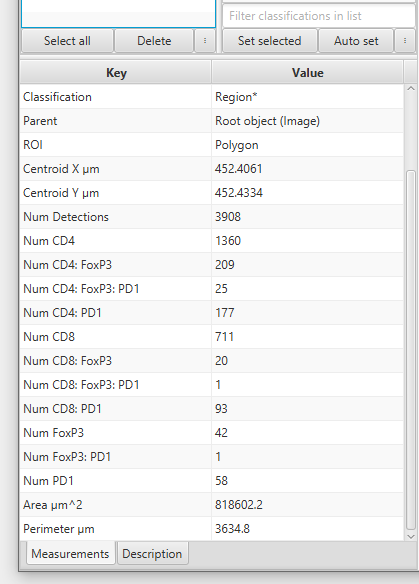
This is the list of the number of cells inside that region that are positive for exactly those markers and no others. In this example there are 711 cells that are CD8+ CD4- PD1- FoxP3-.
The total number of CD8+ cells is:
\(711 (CD8) + 20 (CD8:FoxP3) + 1 (CD8:FoxP3:PD1) + 93 (CD8:PD1) = 825 (CD8s)\)
Investigating unexpected results#
Some classes are unexpected (eg CD8+FoxP3+). Artifact or discovery? Let’s investigate!
In the class list in the Annotation tab,
right click > Populate from existing objects > All classes (including subclasses). Click Yes on “Keep existing classes”
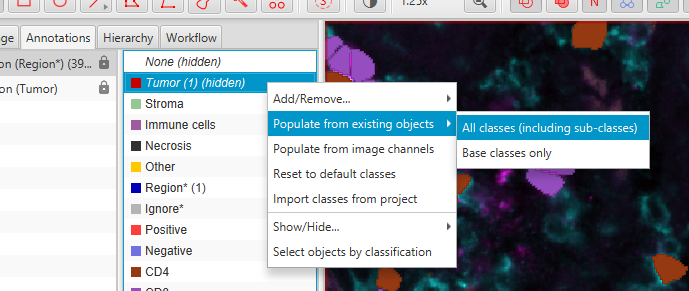
Select “CD8: FoxP3” (or whichever order your cells are named in) and
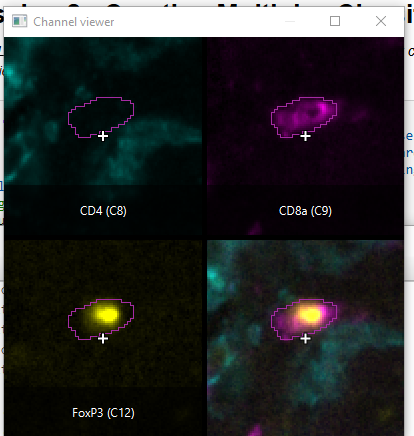
right click > Select objects by classification’Zoom-in on a highlighted cell. Is it really CD8+ and/or FoxP3? Check a few cells. The Channel Viewer (
View > Show channel viewer) can be very helpful here!If you have many cells of this type, chances are there is a problem with either your segmentation or the CD8 or FoxP3 classifiers. Examples:
CD4+FoxP3+ cell incorrectly called CD8+. If you have many of these, you need to go back to the CD4_CD8 training and make it more accurate!
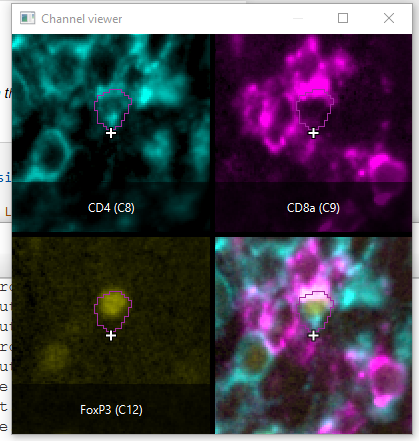
This is 1 object encircling 2 cells (CD8+ and CD4+FoxP3+). Segmentation errors are difficult to fix at this point!
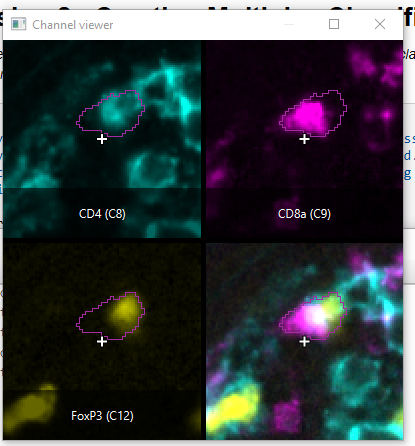
But, don’t automatically dismiss all unexpected combinations! Sometimes they are real!
Easier class visibilty control#
We only have 12 classes of cells, but mIF images can generate hundreds. Here’s an easier way of controlling which cells are on or off at a time.
In Session 1, we set up your Scripts directory, with scripts downloaded from Google Drive. Now, you can go to
Automate > Shared scripts > ClassVisibilityUIIn the Script editor window, click
Run > RunYou can far more easily control which cells are showing.
Note that this script does not interact well with controlling class visibility through the standard GUI!
Consider that with one class, you have two options, positive or negative. 2^1
With two classes, you have four options, 2 single positive, one double positive, and one negative. 2^2 = 4.
With 12 classes, assuming every class was present, you could have 2^12=4096 possible classes! Classifications by channel quickly get out of hand.
Easier cell finding#
You can use the Detection Measurements table to more easily pinpoint cells of interest
Click on the “Show Measurements Table” icon

Select
Show detection measurementsFilter the table by the class of cells:
Right click > Show class > CD8Sort the table by the Classifications column by clicking on it to group the cells by CD8 subtype
Scroll until you see the CD8: FoxP3 cells (or FoxP3: CD8)
Double click on each to highlight and center it. You will need to zoom in to see the cell.
3. Applying the classifier to all images#
For the next step (data export) we’ll need all of the cells in all 3 images to be phenotyped. To do that, you must repeat the measurements and the classifier on the other 2 images. Reminder: in a real project, you should train your classifiers on multiple images. There are two methods for duplicating the measurement step that are functionally the same; pick your favorite:
Manual work#
In the current image, find the step in the Workflow in which we meausured the T cell related features. It will likely be one of the later “Compute Intensity features” entries.
Double click on that entry to bring up the “Compute intensity features” window with all choices pre-populated. Make sure it has the CD4, CD8a, FoxP3, and PD1 channels selected, with the Mean, Standard deviation, Min & Max, and Haralick features checked (see link above). Leave this window open.
Open one of the two remaining images.
In the still open “Compute intensity features” window, click Run
You will get a popup asking which objects you want to measure. Select “Cells” and hit OK
Load the multiplex classifier.
Classify > Object classification > Load object classifier. Select “CD4_CD8_FoxP3_PD1” and click Apply classifier.Repeat steps 4-6 with the third image.
Scripting#
In the current image, find the step in the Workflow in which we measured the T cell related features..
Right click on it > “Copy command”
If not already open, open the Scripting window with
Automate > Script editorCreate a new script document with
File > New(inside Script editor window)Paste the command you just copied
Above that line (new line 1) write:
selectCells()Below that line (line 3), write:
runObjectClassifier("CD4_CD8_FoxP3_PD1")but replace the name inside the parenthesis with whatever you named your classifier. Spelling, capitalization, punctuation, and outer apostrophes all matter.Alternatively, find the command for running the classifier in the workflow tab, and copy-paste it.
Save this. Then,
Run > Run for projectfor the two remaining images