Session 5- Batch Analysis#
Goal - learn how to use the QuPath-created workflow to apply your analysis pipeline to multiple images
YouTube video walkthrough: Session 5
1. Generating the Raw Workflow Script#
The workflow tab helps you remember what you’ve done by keeping track of most of the buttons you’ve pressed, including any parameters that you set (minimum size thresholds, classifier names, etc). We can use this record to create a script that can be run on a batch of images.
Start with LungImg2 open (the version with InstanSeg cell detections)
Open the Workflow tab. It will have a long list of commands that you have tried. If you click on one, it will show you the parameters that you used.
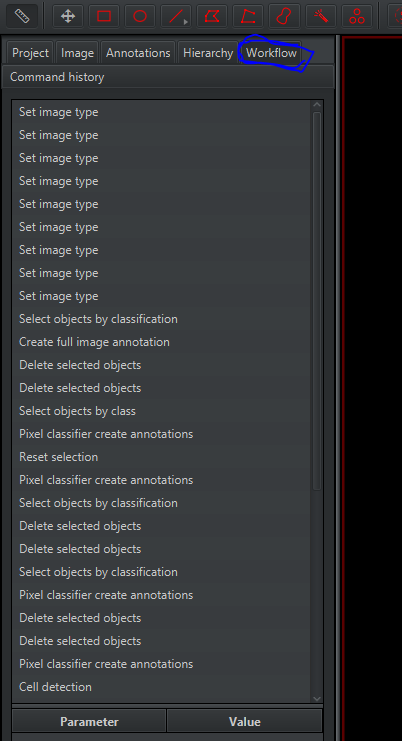
At the bottom of the screen, click Create workflow
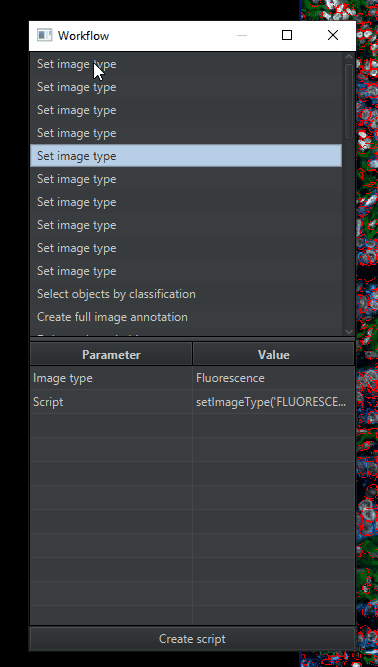
You’ll get a window with a list of commands that you’ve run. We’re going to simplify that list by deleting anything unnecessary for analyzing the other images in the project. Therefore, delete (
highlight > right click > remove selected items):All of the duplicates of “Set image type” , leaving only 1 copy
All of the “Cell detection” lines that ran the built-in cell detection, because we are going to use InstanSeg
All of the “Delete selected objects” or “Clear detections” commands, because they are only useful during optimization.
All but the last “Run InstanSeg model” command
This will leave you with a much shorter list of steps, though it still needs further editing. Click
Create scriptat the bottom to turn the workflow into a draft script.Expand the Script Editor window to make it easier to read. It will look something like this (your exact script will be different).
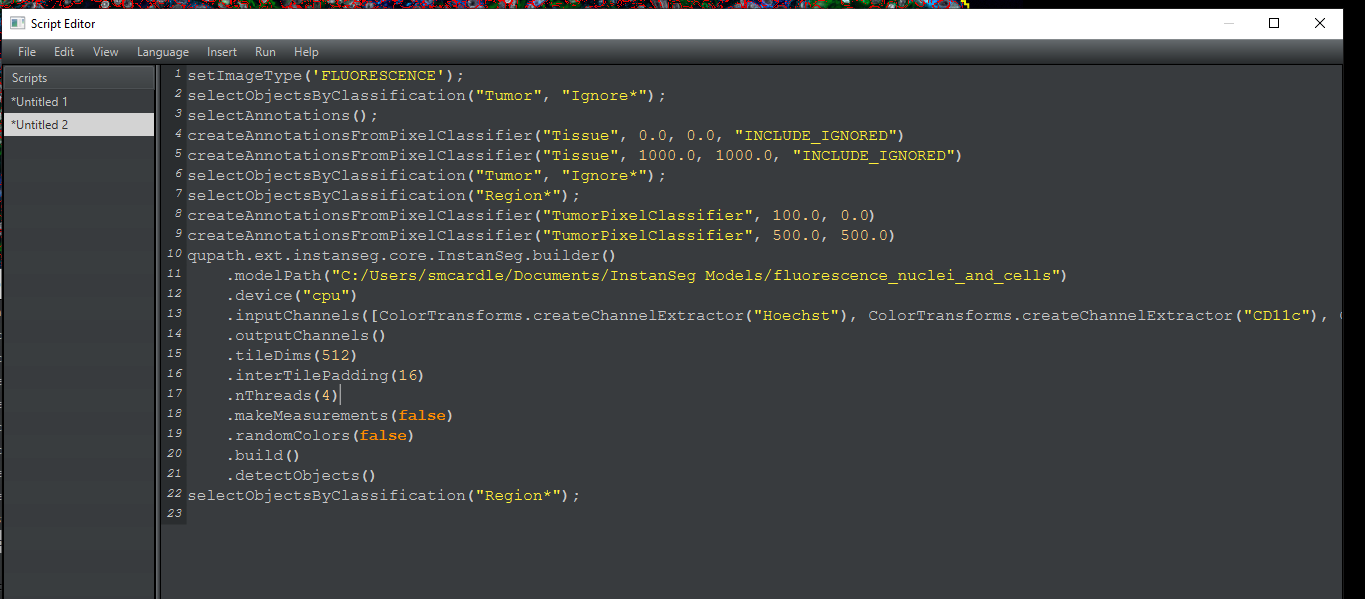
Don’t be scared! It may look overwhelming, but it is just a written-out version of the workflow window. For every item in the workflow, there’s a line of code with nearly identical words.
2. Editing the Script#
From here, we need to remove some extraneous lines and rearrange others to redo our work. Step-by-step, here is what we need the script to do:
Set Image Type:
setImageType('FLUORESCENCE');- this declares that this is a fluorescence image with multiple channels.Segment the whole tissue. This will be one of the lines that starts
createAnnotationsFromPixelClassifier. You will have a few of those in your starting script. Inside the parenthesis are the parameters: Classifier name, Minimum object size, minimum hole size, and any checked options. These are the exact same parameters that you set when you created the object. Find the one with the Tissue annotation and 1000 for each of the size thresholds.
Copy-paste this line to be the second line in the script.

Select the annotation we just made so that all subsequent steps are constrained to the tissue. We can do that with the command
selectObjectsByClassification("Region*");which selects all objects with the Region* class. Copy-paste that to be the third line in the script.
Next, we are going to perform cell segmentation. This is different from the order we originally performed the steps in. Creating the Tumor object after cell detection will prevent it from being deleted. The InstanSeg function to do this is multiple lines, starting with
qupath.ext.instanseg.core.InstanSeg.builder()and ending with an indented line.detectObjects(). Copy-paste that ENTIRE section to be the next part of the the code.
Last, we create the tumor annotation. This was also done with the function
createAnnotationsFromPixelClassifier, but this time look for the one that says “TumorPixelClassifier” (or whatever you named your classifier). Copy-paste that to be line 4. Your parameters may look slightly different than mine.
Delete all other lines after the
createAnnotationsFromPixelClassifier("TumorPixelClassifier", 500.0, 500.0)Save the script! In the Script Editor window,
File > Save As. This will generate a Scripts folder inside your project folder. Give it a meaningful name.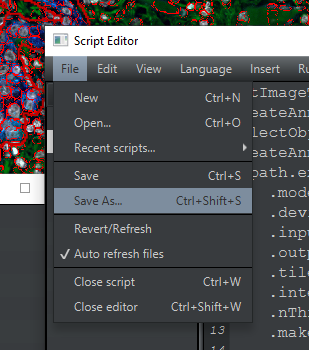
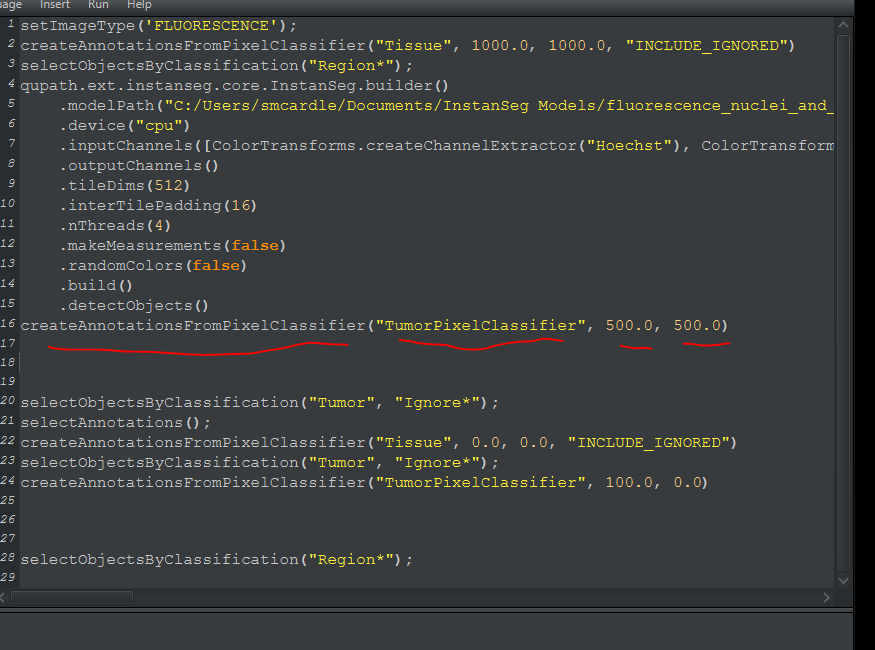
My finished script is pasted below. If you need to, you can copy-paste it. However You must change the path in line 5 to the location where QuPath downloaded the model on your computer. I recommend getting this from your workflow.
setImageType('FLUORESCENCE');
createAnnotationsFromPixelClassifier("Tissue", 1000.0, 1000.0, "INCLUDE_IGNORED")
selectObjectsByClassification("Region*");
qupath.ext.instanseg.core.InstanSeg.builder()
    .modelPath("C:/Users/smcardle/Documents/InstanSeg Models/fluorescence_nuclei_and_cells")
    .device("cpu")
    .inputChannels([ColorTransforms.createChannelExtractor("Hoechst"), ColorTransforms.createChannelExtractor("CD11c"), ColorTransforms.createChannelExtractor("CD68"), ColorTransforms.createChannelExtractor("CD163"), ColorTransforms.createChannelExtractor("CD20"), ColorTransforms.createChannelExtractor("CD4"), ColorTransforms.createChannelExtractor("CD8a"), ColorTransforms.createChannelExtractor("CD45RO"), ColorTransforms.createChannelExtractor("PD1"), ColorTransforms.createChannelExtractor("CD45"), ColorTransforms.createChannelExtractor("S100a")])
    .outputChannels()
    .tileDims(512)
    .interTilePadding(16)
    .nThreads(4)
    .makeMeasurements(false)
    .randomColors(false)
    .build()
    .detectObjects()
createAnnotationsFromPixelClassifier("TumorPixelClassifier", 500.0, 500.0)
3. Run the script#
We’ve gotten through the hardest part! Now, test the script.
Delete all objects in your current image.
Objects > Delete > Delete all objectsIn the script editor,
Run > Runor press Ctrl + R

While it’s running, you will see it say “(Running)”. Just wait and don’t press anything.

If it worked, 2 annotations and thousands of cells appeared. Check the Annotations tab. If you see this HOORAY!
If not, there is an error somewhere. It will probably tell you about the error at the bottom of the Script Editor in red. If you are in the room at the LJI Workshop, raise your hand. Otherwise, ask a question at forum.image.sc and include that error message.
Save the image file (main window, not the Script Editor).
Now it’s time to run on the other images. In the script editor Run > Run for project
Select LungImg1.ome.tiff and LungImg3.ome.tiff (or whichever 2 images you have not yet processed). You can highlight them both at the same time by holdring Ctrl . Then, click the > to choose those images. Then hit OK.
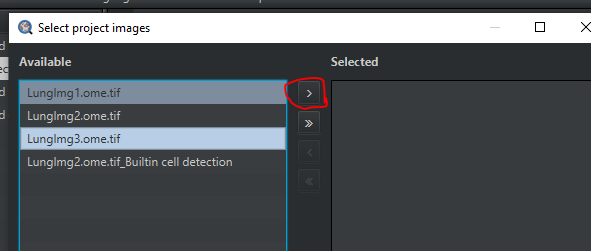
Hooray! You just ran your first batch script!