Session 6 - Classifying Cells (pt1)#
Goal: Learn how to make a Single Measurment Classifier and a ML object classifier to remove artifacts and find cells of interest
YouTube video walkthrough: Session 6
1. Making Cell Measurements#
We purposely turned off “Make Meausurements” in InstanSeg to save time by not calculating every possible metric. We’re going to run some of the calculations now so that we can work with the cells
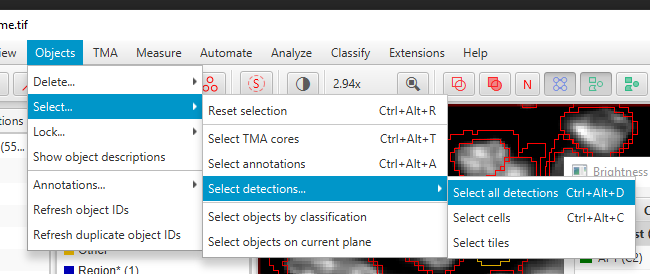
Select All Cells:
Objects > Select > Select detections > Select all detections
Measure the average Hoechst intensity in every cell:
Analyze > Calculate Features > Add intensity features. Then, use these settings:
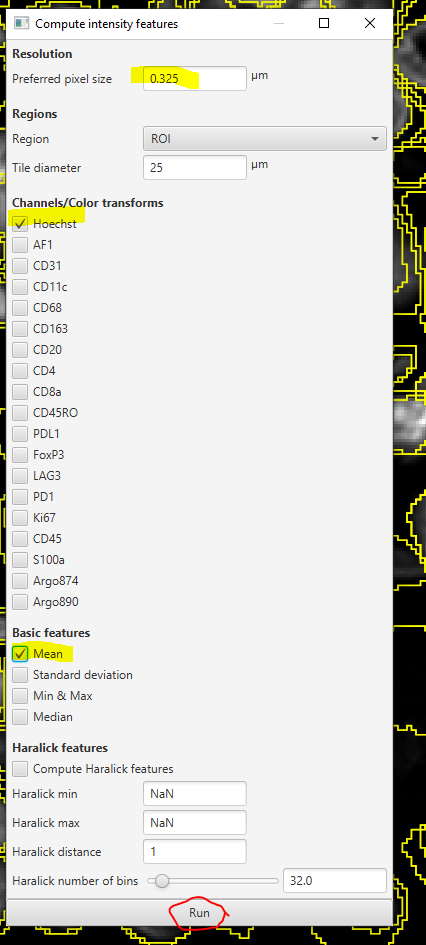
Click Run. It will ask you if you want to “Process All Cells” (with other options in the dropdown). Click OK
2. Finding and removing anuclear cells - Single Measurement Classifier#
InstanSeg bases the cell detection on the nuclear, cytoplasmic, and membrane signals simultaneously. Sometimes, it makes mistakes. In this sample, there are places where the autofluorescent fibers form a gap that looks almost like a cell membrane. But, there is no nucleus and we will not count it as a cell.
We’re going to get rid of these cells using the Hoechst measurement we just made.
Create an object classifier to find cells lacking Hoechst.
Classify > Object classification > Create single measurement classifierMake sure to UNSELECT ALL CELLS before checking the Live Preview. Selected objects always show up as a uniform color.
On the Measurement dropdown, choose
ROI: 0.33 µm per pixel: Hoechst: MeanOn the Below threshold dropdown, choose “Other”
Check Live Preview
Adjust the threshold until you highlight mostly anuclear cells… and just a few “good” cells
Name the classifier and save it
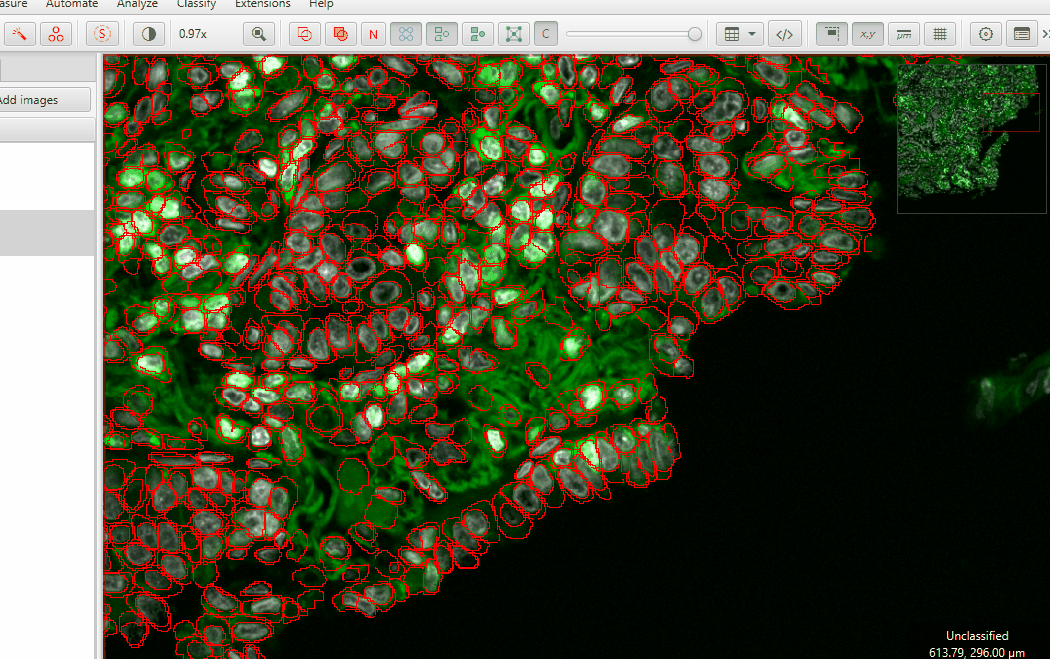
Hit Apply and then close the classifier window
The default “Other” class color looks a lot like the yellow of selected cells. This can be confusing. To change the color of the Other cells, double click class name in the Annotation tab and pick a new color.
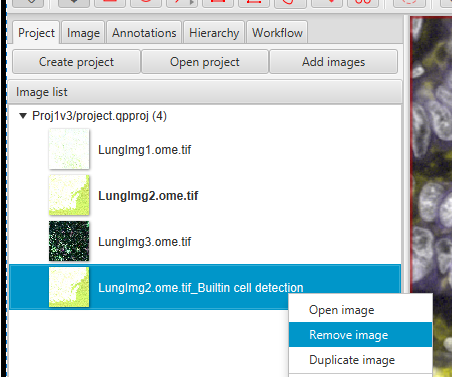
Save the file! Then, duplicate the project to preserve the raw data before you delete the artifacts, in case you change your mind.
Go to your project folder, go one level up, and then copy-paste the entire project.
In the current version of the project, you can delete the version of LungImg2 with the watershed segmentation. In the Project tab, right click on ‘LungImg2.ome.tif_Builtin cell detection’ >
Remove Image.
Select all of the anuclear cells by going to the Annotations tab, right click on
Other, thenSelect Objects by ClassificationDelete the selected, “Other” cells.
Objects > Delete > Delete selected objects
3. Finding Leukocytes - Training an ML Object Classifier#
The Single Measurement Classifier works nicely for distinguishing cells with clear differences in 1 channel. However, in many cases, it is more complicated to find the cells of interest. Machine Learning Classifiers to the rescue! The process of training an object classifier is similar to the process of training a Pixel Classifier
Set up your display settings so that you can see: Hoechst, AF1, CD45, and S100a in different colors. Save these settings.
In the Annotations tab, in the class list,
right click > Add/Remove > Add class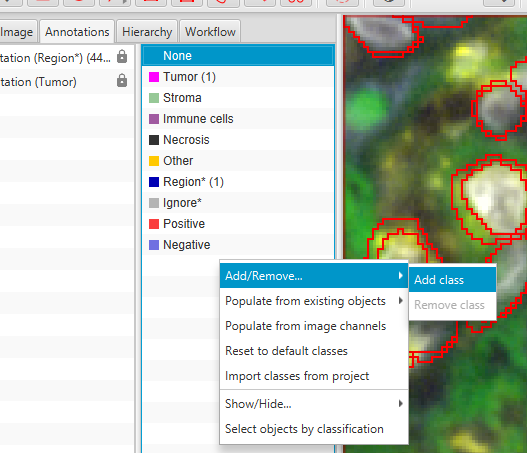
Create the ‘CD45’ class. Turn on Autoset.
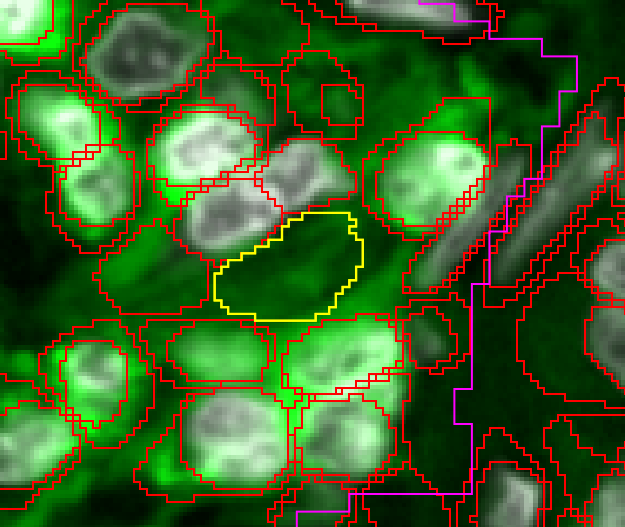
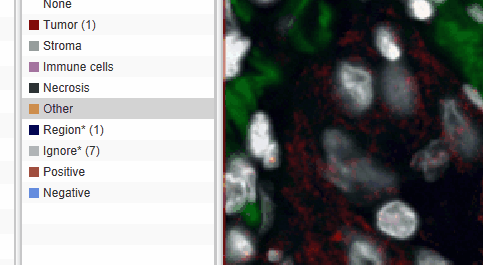
Use the brush tool to mark some CD45+ cells. The annotation must go over the center of the cell, but it does not need to completely cover the boundaries.
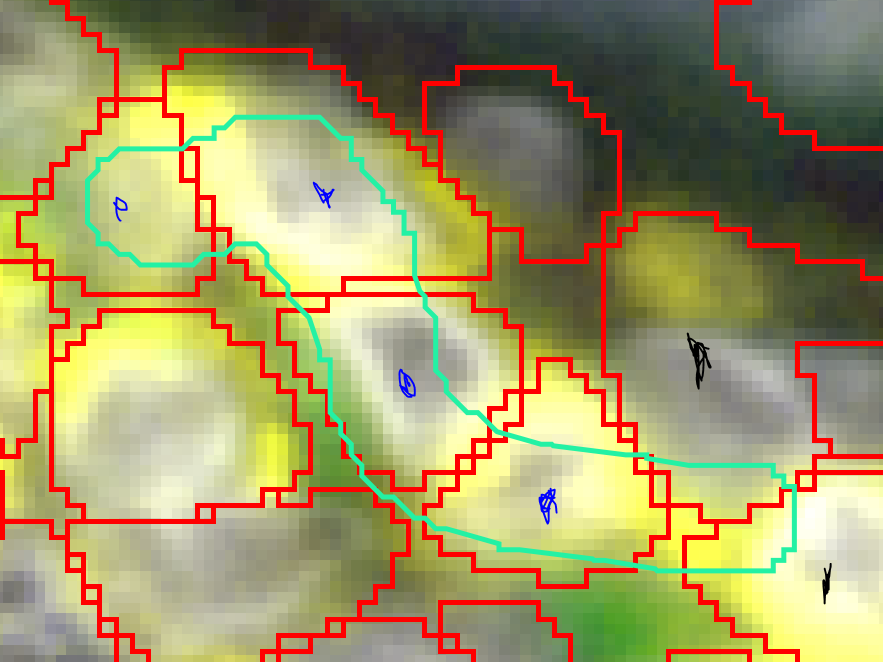
In this image, the cells marked in blue are included in the cyan CD45 training annotation, the cells marked in black are not.
Also mark some CD45- cells with the Ignore* class. Make sure you include some Tumor cells and some CD45- stromal cells. In this example, we are going to focus on CD45 Bright cells. There are CD45 dim cells in the center of some tumor nodules, but we’ll ignore them for now.
So far, we only have Hoechst measurements on these cells. We need other measurements in other channels to identify CD45+ cells.
Select the cells (
Objects > Select > Select detections > Select all detections)Add intensity measurements (
Analyze > Calculate Features > Add intensity features)Set the pixel size (0.325), check the AF1, CD45, and S100a channels, and check the Mean measurement
Hit Run, then OK
Start training an Object Classifier:
Classify > Object classification > Train object classifier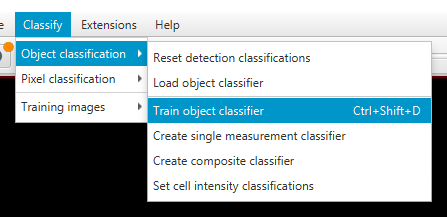
In the classifier training window, click Live update
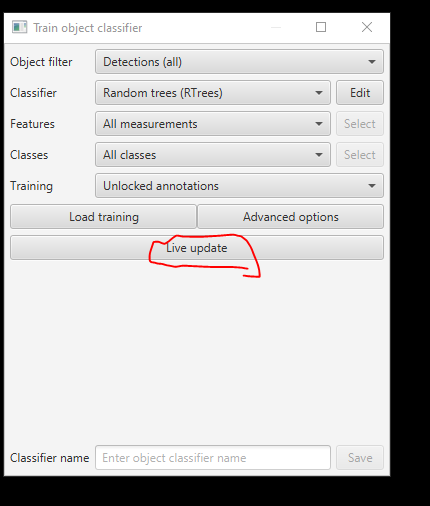
Just like in the pixel classifier workflow, iteratively improve the classifier by correcting mistakes. When it’s satisfactory, give the current version of the classifier a name and save it.
“Satisfactory” is vague. When is good enough?
4. Adding measurements to cells in multiple images#
Just like with the pixel classifier, you cannot extrapolate an object classifier that was trained on 1 image to more samples. In order to train on the other samples in the project, we must perform the same cell measurements on all of the images. You can do this manually or through a script. Because there are only 3 images in this project, going one-by-one is reasonable. Or, learn to script it for the cases where you have hundreds!
Manual Method to repeat the measurements#
Open up one of the other two images you have not yet worked on.
Select the cells and measure the mean intensities in the Hoechst, AF1, CD45, and S100a channels using 0.325 pixel size. (you can save time by doing this as a single step) as described in Step1.
Run the existing Anuclear classifier.
Classify > Object classification > Load object classifier.Choose the Anuclear classifier and hit Apply classifier
Select all “Other” cells (
right click > Select by classification) and delete them (Objects > Delete > Delete selected objects)Repeat these steps on the 3rd image.
Scripting to repeat the measurements#
Go to the Workflow tab and create a new Workflow
Find the
Compute Intensity Featureswhere you measured Hoechst (Ch1). Right above it should be the lineSelect objects by class. Delete everything above this line.
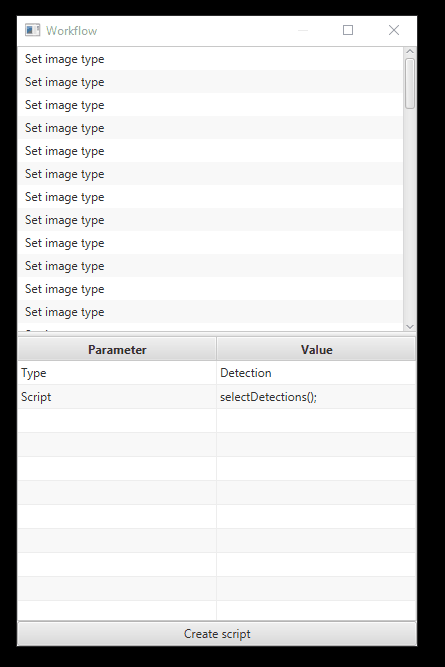
Click Create Script
Just like in Session 5, we need to rearrange this draft script to make it work. The order of the script should be:
Select Detections
Measure mean Hoescht intensity
Run the “Anuclear” classifier
Select “Other” cells
Delete selected cells
Select Detections
Measure mean intensity in AF1, CD45, S100a
Here is mine for reference:
selectDetections();
runPlugin('qupath.lib.algorithms.IntensityFeaturesPlugin', '{"pixelSizeMicrons":0.325,"region":"ROI","tileSizeMicrons":25.0,"channel1":true,"channel2":false,"channel3":false,"channel4":false,"channel5":false,"channel6":false,"channel7":false,"channel8":falseerue,"channel9":false,"channel10":false,"channel11":false,"channel12":false,"channel13":false,"channel14":false,"channel15":false,"channel16":false,"channel17":false,"channel18":false,"channel19":false,"doMean":true,"doStdDev":false,"doMinMax":false,"doMedian":false,"doHaralick":false,"haralickMin":NaN,"haralickMax":NaN,"haralickDistance":1,"haralickBins":32}')
runObjectClassifier("Anuclear");
selectObjectsByClassification("Other");
clearSelectedObjects(true);
selectDetections();
runPlugin('qupath.lib.algorithms.IntensityFeaturesPlugin', '{"pixelSizeMicrons":0.325,"region":"ROI","tileSizeMicrons":25.0,"channel1":false,"channel2":true,"channel3":false,"channel4":false,"channel5":false,"channel6":false,"channel7":false,"channel8":false,"channel9":false,"channel10":false,"channel11":false,"channel12":false,"channel13":false,"channel14":false,"channel15":false,"channel16":true,"channel17":true,"channel18":false,"channel19":false,"doMean":true,"doStdDev":false,"doMinMax":false,"doMedian":false,"doHaralick":false,"haralickMin":NaN,"haralickMax":NaN,"haralickDistance":1,"haralickBins":32}')
Extra Credit assignment: you can combine the two
runPlugin('qupath.lib.algorithms.IntensityFeaturesPlugin'lines into a single command by finding all of the channels set to True the second time it is run, and changing them to True in the first version. Then, you’ll measure all necessary channels at once and can delete the last 2 lines of the script entirelySave the script as “CellMeasurements.groovy”. Run the script for the two new images (
Run > Run for project)
Side Note:#
Sometimes the measurements we have are not sufficient for the classifications we want to make. One example is when a protein clusters in a particular part of the cell, leaving the “mean” values very low, despite a strong presence in one location. Subcellular detections can be used in these cases to check for the “presence” of a protein without relying on a compartment-wide measurement. See the FS2K2023 section on subcellular objects!
5. Combining training data#
If you had closed the object classifier training window, open it again (
Classify > Object classification > Train object classifier)Click Load training
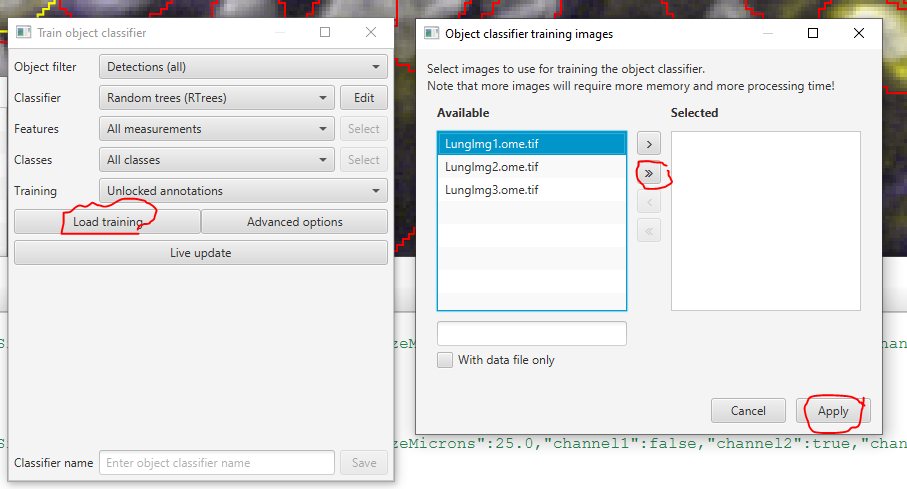
Press the double arrow >> to include all project images in the training set. Then, click Apply
One at a time, add training annotations to each of the 3 images in the project.
You want to mark at least a few CD45+ and CD45- cells in each image
Make sure the results are reasonably good in each image
Name the classifier “CD45” and Save it.
If you scripted the measurements, you can now add this line to the bottom of your script to apply the classifier:
runObjectClassifier("CD45")
You now have a script to find CD45+ leukocytes!
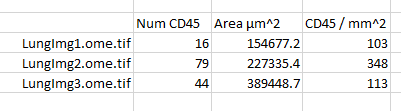
Quantification: Immune infiltrate analysis#
Calculate the frequency of leukocytes inside the tumor boundaries. Click on the Tumor annotation to read the area and the number of CD45 cells inside that region.
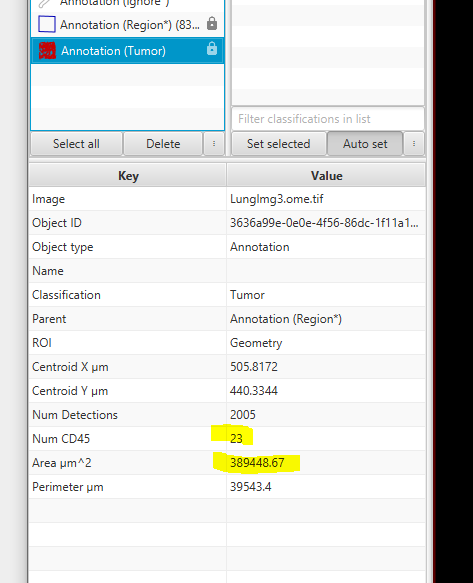
The CD45 frequency is \(NumCD45Cells / Area * 1000000 = cells / mm^2\)
Perform this calculation for all 3 images. My results are: